Skip to top navigation

Skip to my shopping bag

Skip to main content

Skip to footer links

Jackets | Altitude Sports https://kinsta.altitude-sports.com Outdoor Gear Guides, Stories & Reviews Wed, 12 Nov 2025 21:13:26 +0000 en-CA hourly 1 https://wordpress.org/?v=5.8.9 https://kinsta.altitude-sports.com/wp-content/uploads/2024/04/cropped-Symbol-Altitude-Sports-2024-32x32.png Jackets | Altitude Sports https://kinsta.altitude-sports.com 32 32 How to Find Your Quartz Co. Fit https://kinsta.altitude-sports.com/en/how-to-find-your-quartz-co-fit/ https://kinsta.altitude-sports.com/en/how-to-find-your-quartz-co-fit/#respond Wed, 12 Nov 2025 21:13:03 +0000 https://kinsta.altitude-sports.com/?p=144111 Find your perfect Quartz Co. fit. This in-depth guide explains how to measure, compare, and choose the right jacket—so your Canadian outerwear delivers lasting warmth and comfort, with a dash of effortless style.

The post How to Find Your Quartz Co. Fit appeared first on Altitude Sports.

]]>

When it comes to outerwear, warmth isn’t only about insulation—it’s about how your jacket fits. A well-fitted parka seals in more heat, moves with your body, and layers easily, keeping you comfortable through season after season of changing weather.

That balance between form and function is what defines Quartz Co., a Canadian brand designing refined, responsibly made outerwear that thrives in the world’s harshest winters. Each jacket is engineered for performance, durability, and timeless appeal—proof that technical design can look as good as it feels.

Still, finding your perfect size online isn’t always easy. Most shoppers agree that “sizing uncertainty” is one of the biggest barriers to buying premium outerwear. That’s why we created this Quartz Co. fit guide—to help you measure accurately, understand each fit, and shop confidently. Whether you’re commuting downtown or venturing north of 60°, the right fit makes all the difference.

Understanding Quartz Co. Fits

Founded and designed in Canada, Quartz Co. combines technical performance with clean urban tailoring. Every jacket is cut and stitched to maintain the perfect balance of mobility, structure, and warmth retention—qualities that depend heavily on choosing the right fit.

Quartz Co. offers these primary silhouettes: Fitted, Semi-fitted, Slim-straight, Regular, and Oversized. Each one’s designed with a specific purpose in mind. In other words, the right fit isn’t just about how the jacket looks; it also affects its ability to insulate, its layering potential, and your freedom of movement.

Fitted & Semi-fitted — Tailored Warmth

Fitted (or slim) jackets follow your body’s natural lines without ever feeling restrictive. Designed with a close silhouette and minimal bulk, the Quartz Co. Fitted style is ideal for city living, cycling commutes, and modern wardrobes where function meets refinement.

Because the fabric sits nearer to your body, warm air stays contained, and insulation performs at peak efficiency. The result is a sleek, wind-cutting layer that moves fluidly while maintaining consistent warmth. While the silhouette flatters most body types, it shines in temperate or urban climates where lighter layering is the norm.

Semi-fitted also follows your body’s natural lines, but with a little more wiggle room to allow for light and heavier layers.

Fitted and Semi-fitted styles are best for: commuters, style-focused wearers, temperate climates, or those who rarely wear heavy mid-layers.

Quartz Co. Fitted Jacket

Brand Name | Product Type

Product Name

Price: 0.00$

Price: 0.00$

Quartz Co. Semi-fitted Jackets

Slim-straight & Regular — Everyday Balance

Slim-straight styles are another step up from their slim fits. The only difference is that it doesn’t cinch at the waist, allowing for more freedom of movement, while still providing some contouring for a refined look.

Regular fit is the most versatile of Quartz Co.’s fits, delivering all-day comfort with enough space for a warm midlayer while maintaining an urbane, structured look. It’s the silhouette most people gravitate toward instinctively—neither snug nor oversized, but perfectly balanced.

Quartz Co. slim-straight and regular-fit coats are engineered to provide a more natural range of motion through the shoulders, arms, and waist, for a comfortable commute to work, catching a flight, or exploring in unpredictable weather. The moderate room also helps evenly distribute insulation, ensuring consistent warmth without adding weight or bulk.

Slim-straight and regular styles are best for: all-season versatility, moderate layering, and balanced silhouettes.

Quartz Co. Slim-straight Jackets

Quartz Co. Regular Jackets

Oversized Fit — Freedom to Layer

Oversized prioritizes comfort and adaptability above all else. Roomier through the torso, shoulders, and sleeves, the Quartz Co. oversized fit is designed for seamless layering—perfect when temperatures plummet and insulation becomes your first line of defence.

The extra volume accommodates thick sweaters, fleece pullovers, or down vests without feeling bulky or stiff. That additional space also improves airflow and maintains insulation loft, preventing the down or synthetic fill from being compressed. The result is a parka that stays warm, breathable, and mobile, even in deep cold.

Beyond pure performance, oversized pieces embody the easy confidence of Canadian winter living: throwing on your coat for a morning walk, chopping wood at a cabin, or braving a whiteout on your daily commute. These jackets keep you warm without restriction—protective yet unpretentious.

Oversized styles are best for: colder regions, heavy layering, and those who love an easy, roomy feel.

Quartz Co. Oversized Jackets

Quartz Co. Fits, At a Glance

Fit Type

Silhouette

Best For

Layering Space

Fitted, semi-fitted

Streamlined

Urban style, light layering

Minimal

Slim-straight, Regular

Balanced

Everyday versatility

Moderate

Oversized

Spacious

Cold climates, heavy layers

Generous

How to Measure Yourself for a Quartz Co. Jacket

Getting the right fit starts with knowing your numbers. Even the most advanced outerwear performs best when it moves naturally with you—and that precision begins with a quick measuring session. Taking a few minutes now will save you time (and return shipping) later when referencing the Quartz Co. size guide.

All you’ll need is a soft measuring tape, a mirror or a friend’s help, and light base-layer clothing—no bulky sweaters or jackets.

The chart below outlines how to measure key areas of the body for the best fit. Each measurement directly reflects how your Quartz Co. jacket performs in terms of warmth and movement. Use it alongside the Quartz Co. jacket size chart when shopping online.

Step-by-Step Measuring Guide

Step 1: Determine your size

Fit Guide for Quartz Co.

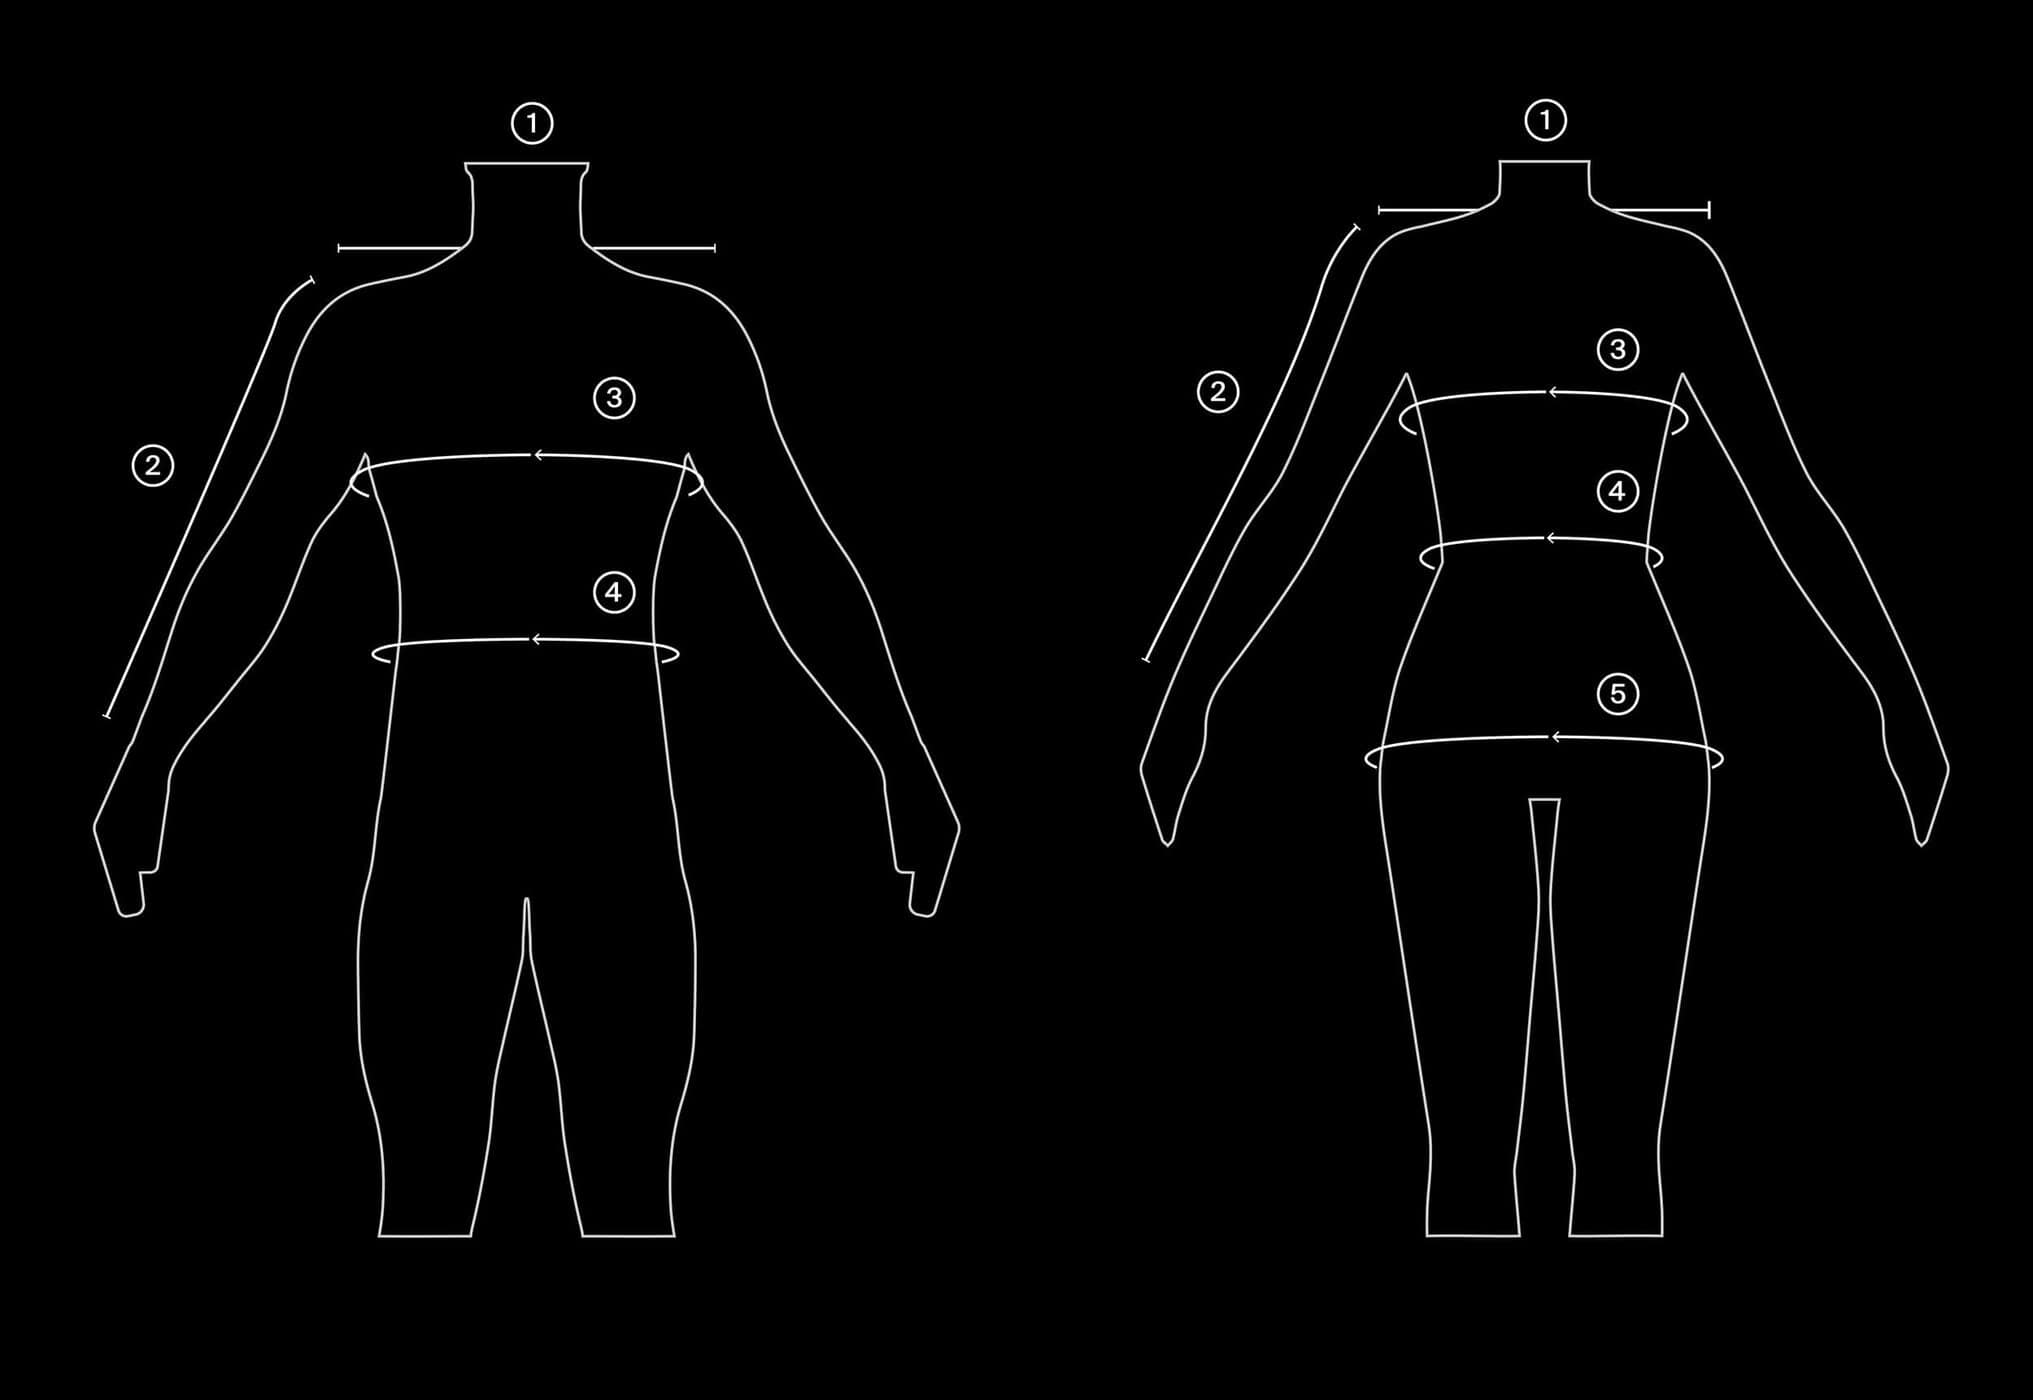
Begin by measuring your shoulder width (1), sleeve length (2), bust (3), waist (4), and hips (5).

Pro tip: Take each measurement twice for consistency. Even a one-centimetre difference can affect your fit choice!

Common Mistakes to Avoid

  • Measuring over heavy clothing
  • Pulling the tape too tight
  • Guessing instead of checking each side (especially shoulder width)

Size Chart Quartz Co.

Size Chart Quartz Co. in inches

Step 2: Converting your size from your measurements

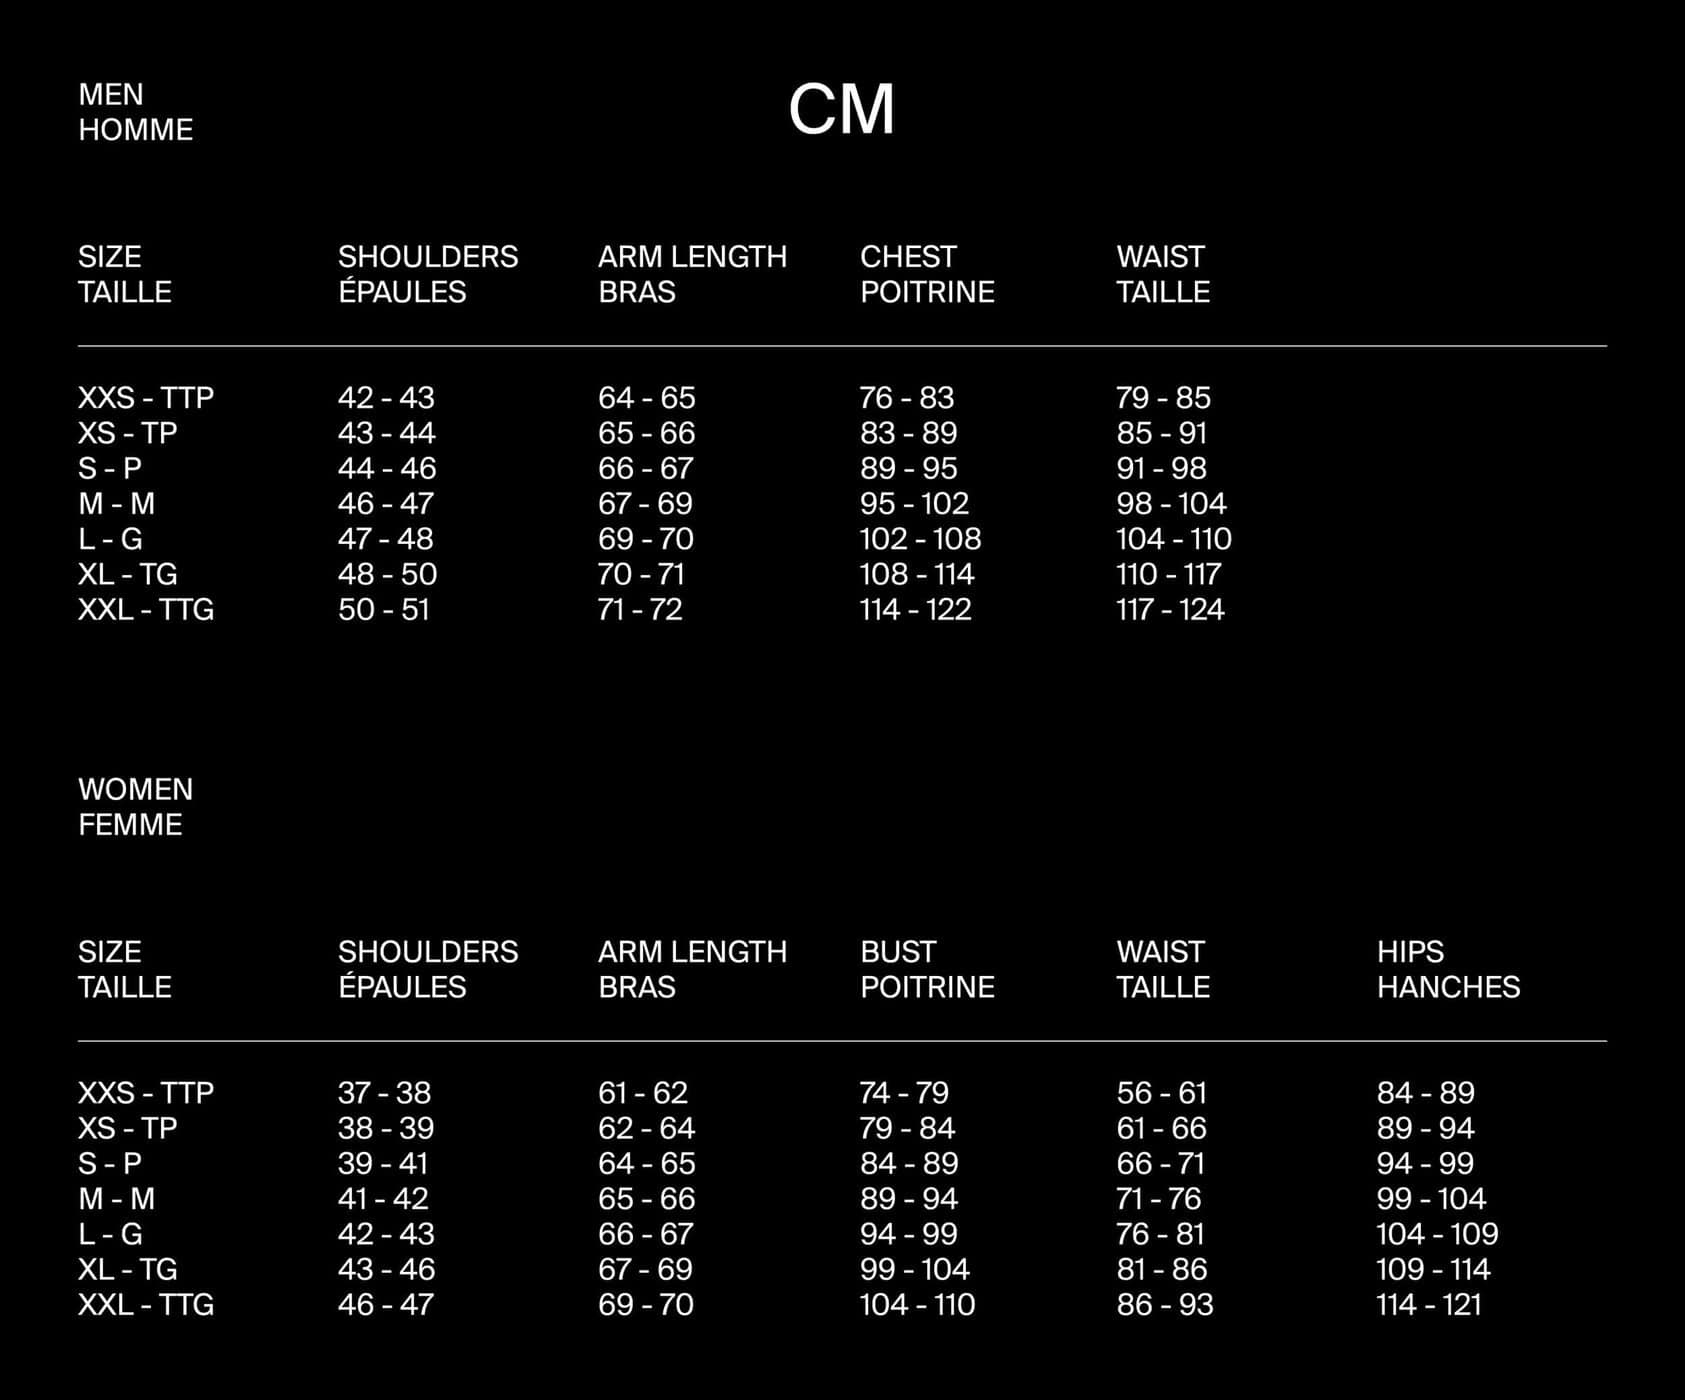
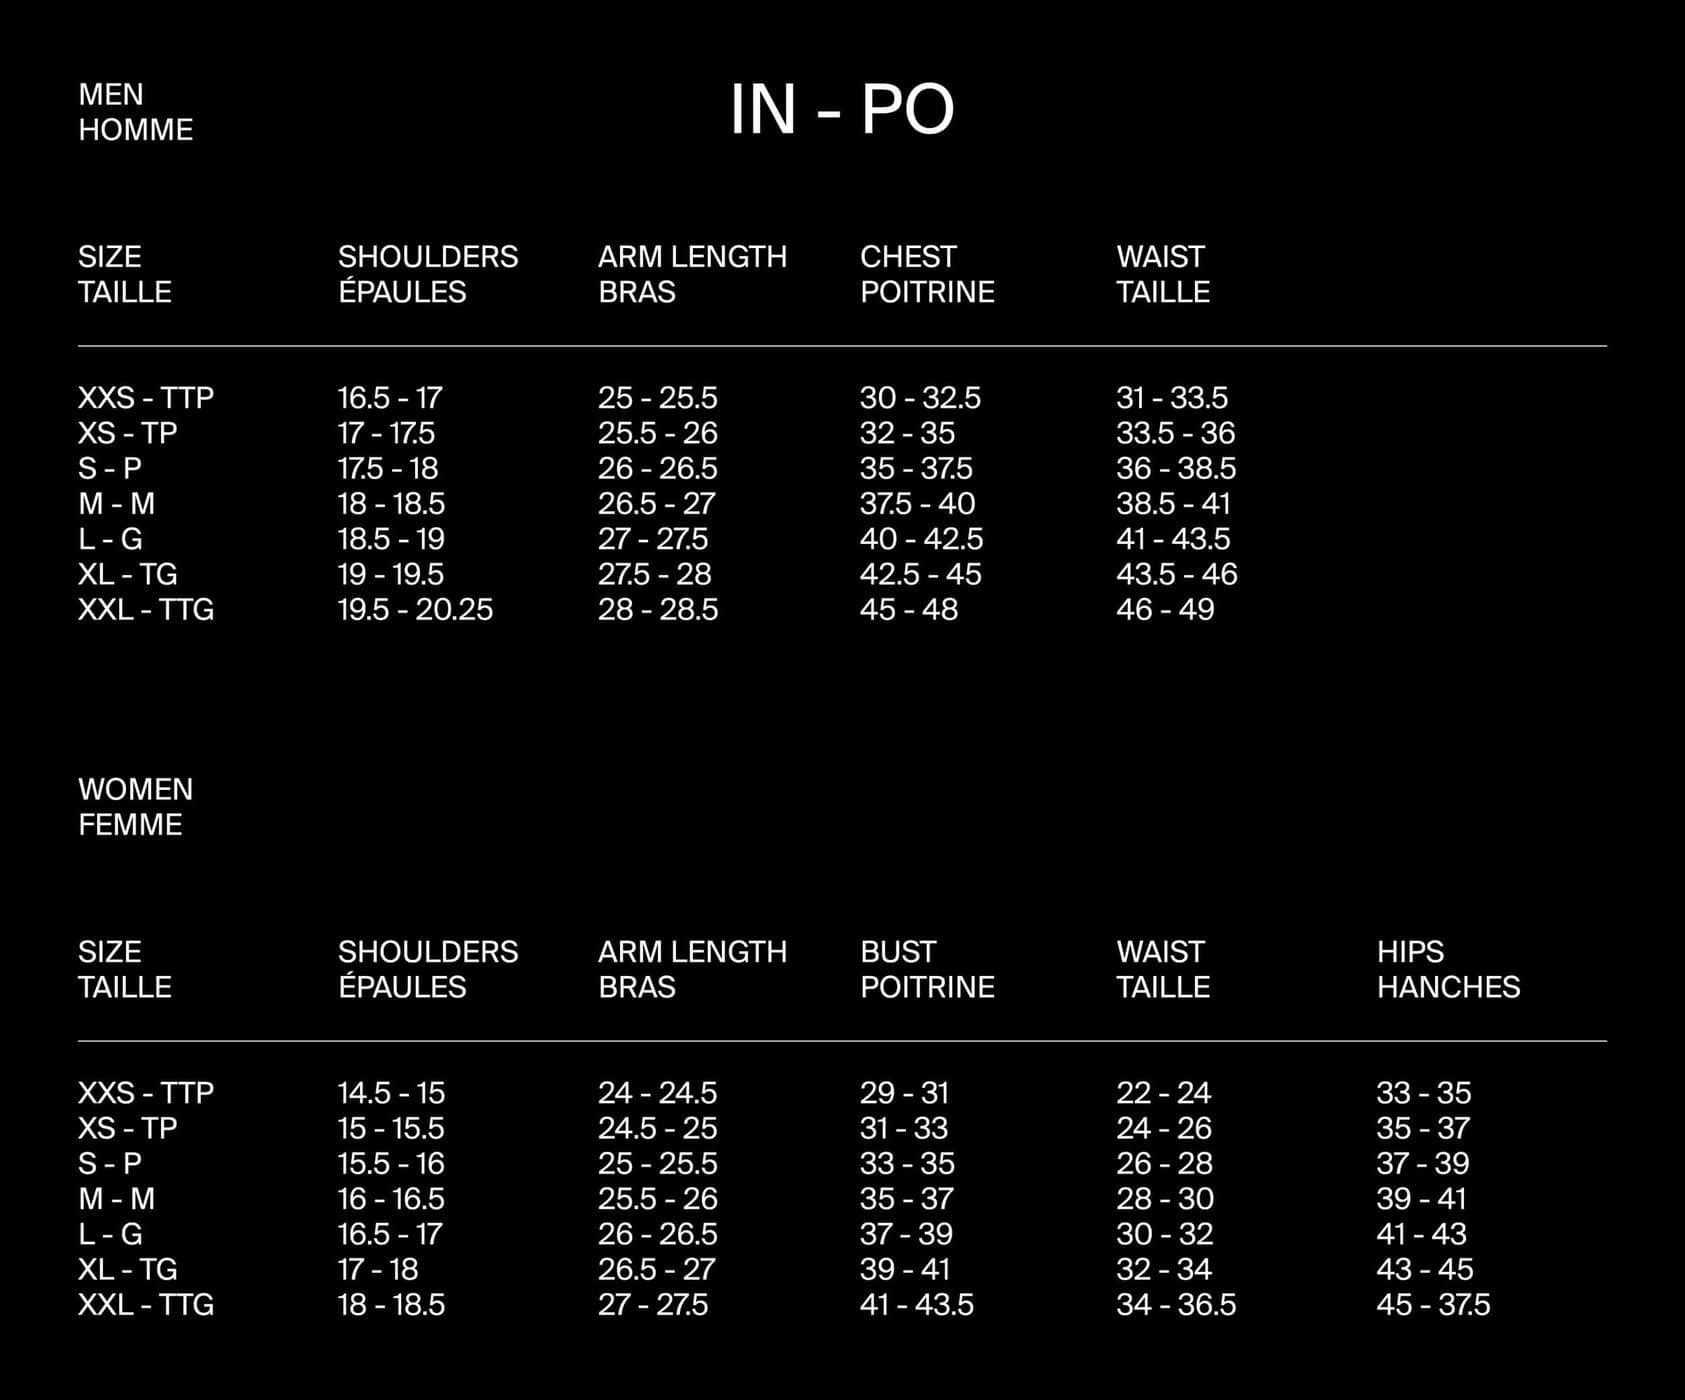
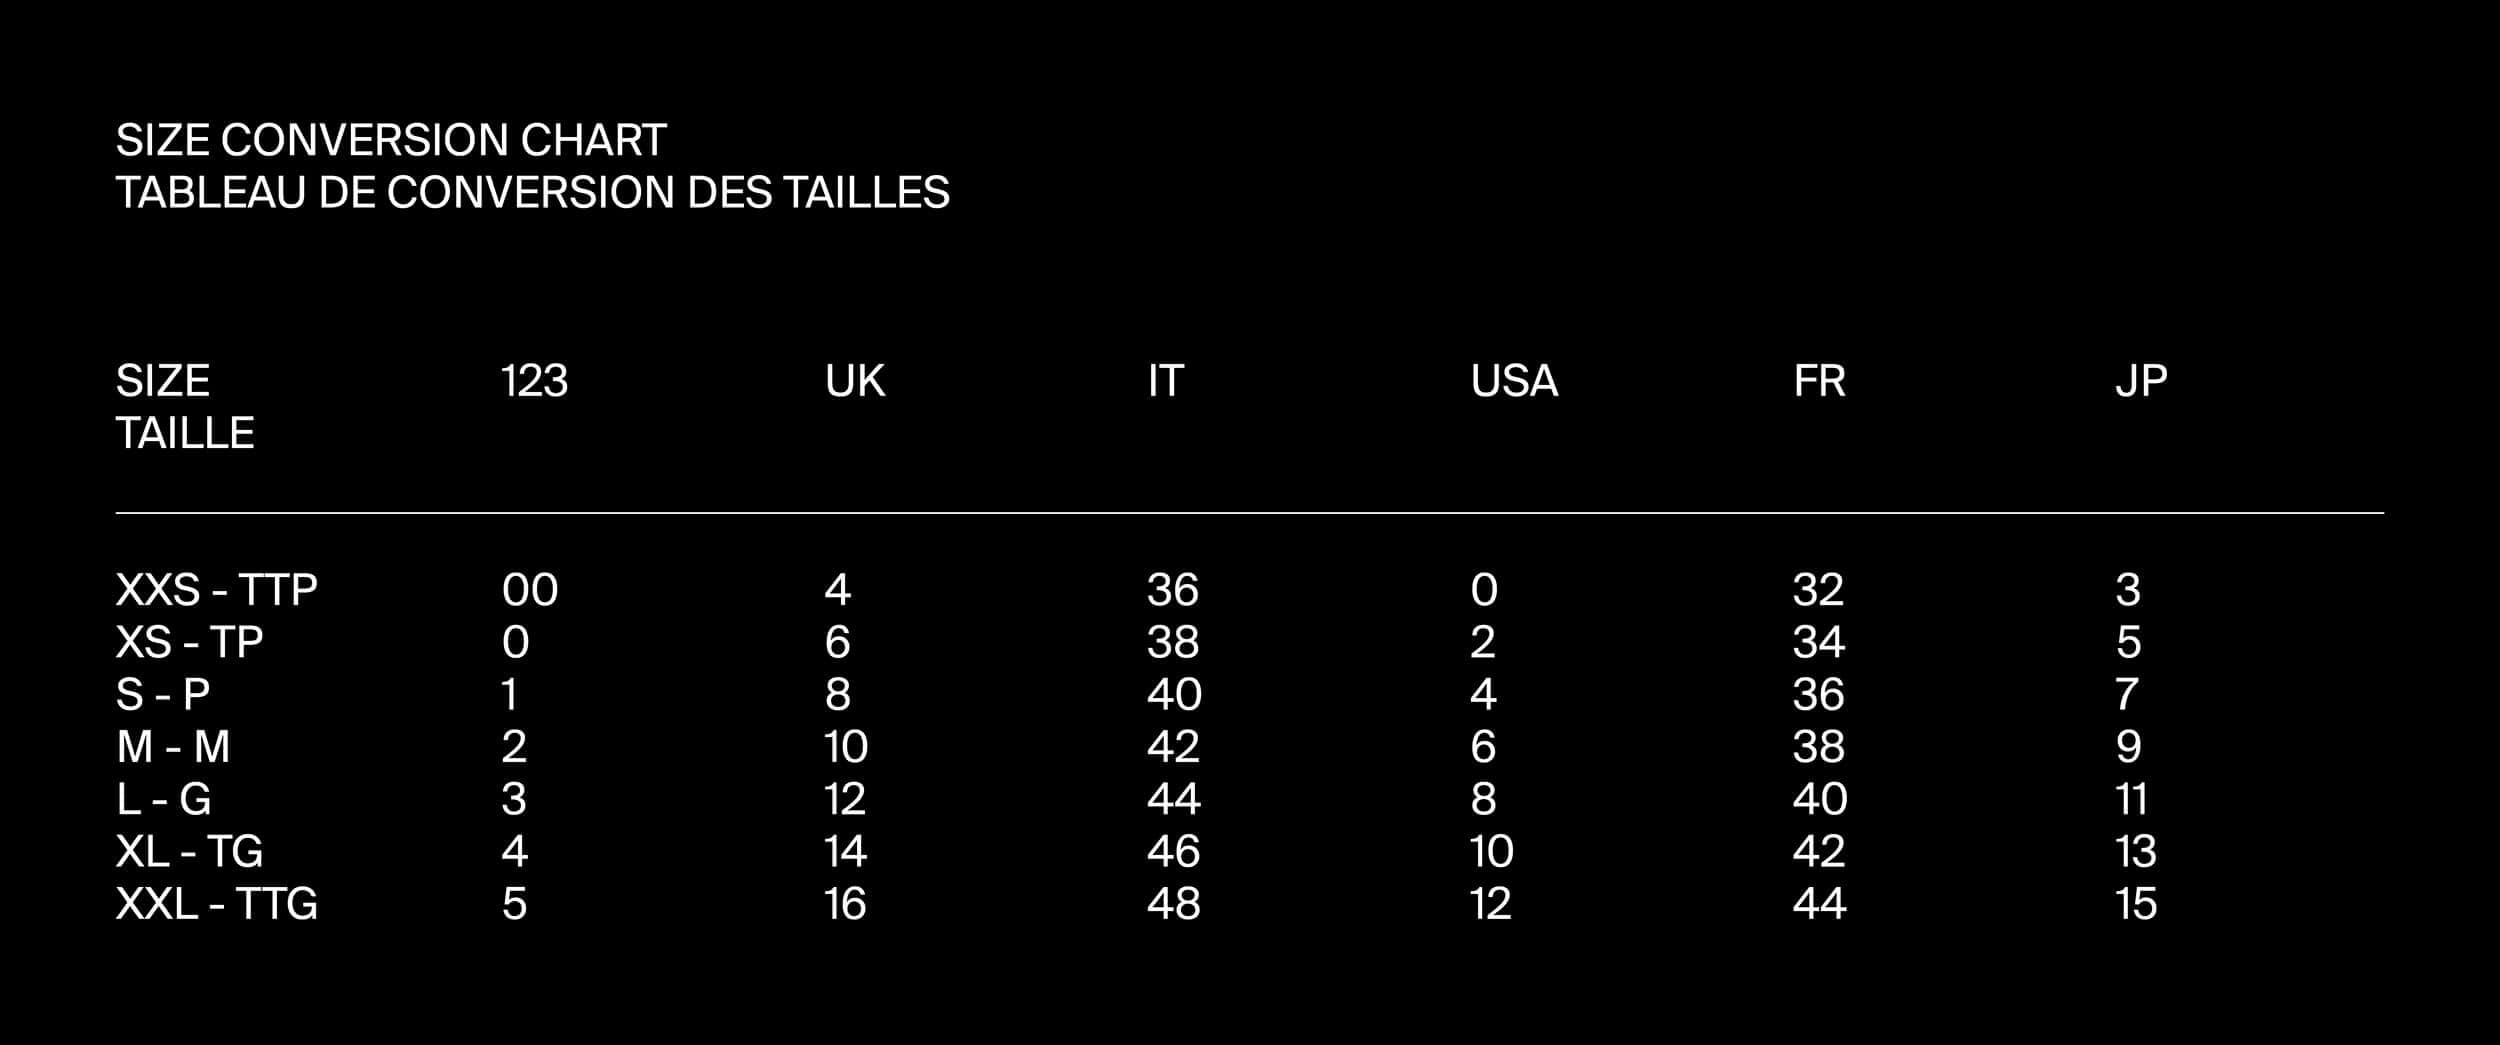
Once you’ve recorded your measurements, it’s time to turn numbers into confidence. Compare them to the official Quartz Co. size chart and use the guide below to fine-tune your choice. These Quartz Co sizing tips will help you decide whether to size up, down, or stay true.

If you typically wear European or US sizes, note that Quartz Co. uses North American sizing (USA in the chart), closely aligned with standard Canadian measurements.

Quartz Co. Size Conversion Chart

Note:

  • Slim Fit/Fitted → Size Up if you fall between two sizes or plan to wear a sweater or light fleece underneath.
  • Semi-Fitted to Regular → True to Size for most people—provides ample room for light layering without excess bulk.
  • Oversized→ Size Down if you prefer a more streamlined silhouette.

Once you’ve ordered and received your jacket, it’s time for the final fit check—the movement test. Raise your arms, cross them over your chest, and twist slightly at the waist. If you feel pulling at the shoulders, armpits, or elbows, the size is too small; if you feel bunching at the back, there’s a good chance it’s a tad too roomy.

The bottom line is this: Proper sizing not only improves comfort but also prolongs your jacket’s life. That’s because a correctly fitted coat distributes tension evenly across seams and zippers, reducing wear over time.

Consider your jacket’s uses as well: For Atlantic or Prairie winters where windchill dominates, maybe a Regular or Oversized fit will better accommodate the cold by allowing you to wear thermal layers. In milder coastal or urban settings, Slim fits deliver the best balance of mobility and heat retention.

Quartz Co. Sizing by Body Type and Lifestyle

Even after all those measurements, finding your perfect Quartz Co. jacket isn’t just about numbers—it’s about how you wear it. Whether you layer heavy, move fast, or live somewhere in between, these profiles make it easy to choose the right fit at a glance. Use the table below as a quick reference.

Profile

Recommended Fit

Why It Works

The Layering Lover

Oversized

Extra volume for down or fleece mid-layers

The Minimalist Commuter

Fitted/Semi-fitted

Streamlined under backpacks or office attire

The Weekend Explorer

Slim-straight/Regular

Flexible for hikes, errands, and travel

Taller / Broader Frames

Regular → Oversized

Added shoulder and sleeve space

Cold-Climate Residents

Oversized

Prevents insulation compression in deep winter freezes

Transitional-Season Wearers

Fitted → Regular

Light layering for spring and fall

By Climate

  • Arctic or Prairie cold: Consider relaxed for layering down or wool.
  • Urban coastal winters: Fitted or Regular for mobility and wind protection.
  • Temperate zones: Regular for year-round adaptability.

Ultimately, the choice is yours, and Quartz Co.’s range of jackets provides styles for just about any lifestyle.

FAQ

Do Quartz Co. jackets run true to size?

Yes. All of their different fits, from Fitted to Oversized, are calibrated to deliver the intended silhouette. Most customers find their usual size works well, but we always recommend checking the Quartz Co. size chart for the most precise match to your body measurements.

What if I’m between sizes?

Consider your climate and layering habits. For heavy knits or colder regions, size up to preserve mobility and insulation loft. For a sharper outline in milder weather, size down slightly—but only if you don’t plan to wear thicker layers underneath.

Can I size down oversized styles?

Definitely, sizing down slightly can create a neater silhouette while maintaining full warmth. Just ensure the shoulders and sleeves still allow a natural range of motion, especially if you’ll be driving, hiking, or commuting daily.

What’s the best fit for travel?

We recommend a Regular fit for travel. It provides enough room for a light mid-layer yet remains compact enough to pack or wear comfortably through airports and variable climates. Many travellers find it’s the most versatile balance of performance and polish.

Is it easy to exchange sizes?

Yes. Altitude Sports offers a simple 30-day return policy, so you can order confidently, try your jacket on at home, and swap if needed. Our customer service team can also advise on measurements before you buy, helping ensure the perfect fit on the first try.

How do men’s and women’s fits differ?

Women’s jackets are slightly narrower at the waist and shorter in sleeve length, while men’s designs allow for broader shoulders and longer arms. Otherwise, both collections follow identical sizing logic—so a Medium in one will align closely with a Medium in the other.

Find Your Fit, Own the Cold

Choosing the right Quartz Co. fit is more than a sizing decision—it’s a comfort strategy for years to come. A jacket that matches your build and habits keeps you warmer, moves better, and endures longer. Plus, it looks awesome.

With decades of Canadian design expertise, Quartz Co. continues to refine how winterwear should feel: protective yet elegant, technical yet timeless. Whether you opt for a streamlined city coat or a parka built for the polar vortex, each piece is crafted to move naturally with you.

This fall and winter, shop the full Quartz Co. collection on Altitude Sports—find the silhouette that turns every wind-chilled day into an invitation, not an obstacle.

The post How to Find Your Quartz Co. Fit appeared first on Altitude Sports.

]]> https://kinsta.altitude-sports.com/en/how-to-find-your-quartz-co-fit/feed/ 0 How to Fix Tears in Shells & Down Jackets https://kinsta.altitude-sports.com/en/how-to-fix-tears-in-shells-and-down-jackets/ https://kinsta.altitude-sports.com/en/how-to-fix-tears-in-shells-and-down-jackets/#respond Wed, 30 Oct 2024 20:20:29 +0000 https://kinsta.altitude-sports.com/?p=136374 Keeping our outdoor garments clean and maintained not only exceptionally prolongs their life, it helps reduce unnecessary waste that continues to be a problem scarring our environment. With Helly Hansen, an expert in performance outdoor gear, we’re here to teach you how to repair your hardshells and jackets, so you can continue to use them for years to come.

The post How to Fix Tears in Shells & Down Jackets appeared first on Altitude Sports.

]]>

Understanding the Damage

It’s always good practice to evaluate the damage and its implications for your specific jacket, whether it’s a winter jacket, puffer, or breathable shell, before starting any repairs. Try to assess the size, location, and how your ripped jacket has been affected before making a final decision to replace it.

Small Cuts or Punctures: These small perforations or rips tend to happen when our hiking shells get snagged on a branch or thorn in the woods, or when we take a bit of a tumble. Either way, these micro accidents happen often enough, but are fairly easy to repair using simple patchwork.

Seam Splits: Seam splits are more of a nuisance. It happens when the joining fabric pieces of your jacket rip apart. Seam splits will typically require sewing, depending on the severity of the tear.

Large Rips: Larger rips can occur if smaller tears are untreated and left to worsen overtime. They can also be the result of more aggressive snags and falls while backcountry skiing, for example. However, these can be patched easily too.

Jacket Materials:

Outdoor performance jackets, especially skiing shells like Helly Hansen’s, feature heavy-duty technology ranging from down to unique innovations like Helly Hansen’s own HELLY TECH® waterproof and breathable system. Whether you have a down jacket or a synthetic one, the repair methods are often similar. How you both treat and mend these can differentiate. The great news is that it doesn’t really matter what kind of jacket you have – nylon, polyester, down, GORE-TEX, or even waxed – the repair method to the damage is often the same, with only slight variations depending on the severity.

When to Repair vs. Replace:

It can happen that the damage is too extensive, in which case, it might be time to part ways. Ultimately, it’s up to you to make the final decision, but hopefully, you’ve given it your best effort first. We believe that unless the jacket is falling apart into pieces or refuses to be anything other than a sponge for the rain and snow, it might be time to swap it out for a new one. But holes, rips, and tears in our coats, or a little wetting out in our rain jackets are all curable ailments. So, if you’re ready and willing, the next section will guide you through giving your jacket a second life, restoring it to its full functionality.

Essential Tools & Materials

Brand Name | Product Type

Product Name

Price: 0.00$

Patch up your waterproof gear if the need arises.

  • Black
  • Waterproof fabric

Price: 0.00$

Some other useful tools you may want to have beside you are:

  • Scissors
  • Clean cloth or antiseptic towelette

There are also some other tools that will come in later in this blog for re-waterproofing your shell coat after patching the holes or tears.

Patch Repairing for Different Types of Damages

Before you do anything, make sure to carefully read the instructions written on the packaging of your repair kit. Different kits require different application methods. Some adhesives need to be set with the help of an iron, while others, like the Helly Hansen repair kit in this example, require only pressure from our hands. While duct tape can be used for emergency repairs, it is not recommended for long-term fixes as it may lead to further damage.

Step #1: Clean the area of your shell jacket using a clean cloth, or you may also use an antiseptic towelette to clean the torn or perforated area. If there’s fraying or loose threads, trim them.

clean_the_rip

Step #2: Take a patch out with rounded corners from the repair kit. Cut the patch to the appropriate size of the tear. It should overlap the torn area about half an inch on all sides. Before placing the patch, make sure to join the torn edges together. 

Cut_repair_Patch

Step #3: Remove the sticker at the back of the adhesive patch and apply it to the torn area.

Step #4: Smooth out the edges by applying pressure using a circular motion from the centre outward using your hands. Let the adhesion cure for a full 24 hours to reach full strength.

Smooth_the_patch

Step #5 (optional but recommended): You can choose to only apply a patch to the front facing side of the tear, but you’ll get a better quality patchwork by adding a second layer on the inside. This will help add more weatherproofing as well. To do so, simply turn the jacket inside out, and repeat the same process.

Other types of repair methods might involve sewing, ironing (if a specific patch you’re using requires a heat application), or even glue. Whichever method you need, you should prepare accordingly. There could even be a mix of different methods. It all depends on the affected area of your torn jacket.

Waterproofing Your Jacket Post-Repair

Once you’ve successfully patched up your shell jacket, it’s time to make it as durable and performative as it was when you first received it. We strongly recommend doing this next part after patching, otherwise it’s a little like forgetting to tighten the screws on an assembly.

What makes Helly Hansen an authority on performance jackets isn’t just through their products like their Odin Jackets, but also because of their deep understanding of the technology they use. They offer various solutions, guides, and other how-tos to ensure that you get a generation’s worth of use from each and every one of their coats. After all, a Helly Hansen jacket is of premium quality, but like anything in this world, just needs to be shown a little TLC from time to time.

The Odin jacket is a 3-layer shell praised by professional athletes. Featuring Helly Tech® and LIFA INFINITY™ technologies, this lightweight jacket is designed to deliver exceptional breathability and waterproof performance.

Price: 0.00$

Brand Name | Product Type
The Odin jacket is a 3-layer shell praised by professional athletes. Featuring Helly Tech® and LIFA INFINITY™ technologies, this lightweight jacket is designed to deliver exceptional breathability and waterproof performance.

Price: 0.00$

When it comes to most outdoor waterproof-breathable shells, they’re often manufactured with a thin coating of what’s called Durable Water Repellent (DWR). It’s this that allows water to bead off. Overtime, however, this coating wears away. Whether your jacket has gotten dirty from dirt or sweat, or too much abrasion from nature that involves sap or grime, food residue, other liquids, and the usual wear and tear, DWR loses its potency.

You can see in the image below the difference between reduced DWR effectiveness and functional DWR.

DWR_difference

There are a couple of ways to reapply DWR to your jacket and both are fairly simple: The first is to get a spray. The second is a detergent that can be used in the washing machine. 

For spraying, you’ll get a better result by making sure that your jacket is a little damp beforehand, so be sure to put it through a wash cycle first. Then, you can take your spray. Stand back enough away to get a good mist cover, and spray over the whole jacket. Then you can take a cloth to evenly distribute the agent over the fabric.

The second option is a detergent that can be used in your washing machine. Again, read both the instructions on the waterproofing detergent and the care instructions on your jacket (Helly Hansen often has this on the left hip of their jackets). The process is quite simple: The detergent will replace your normal detergent—don’t use both–and, depending on whether you have a top-loading or front-loading washer, try to only wash one or two jackets at a time.

Caution: If you own a top-loading washing machine with an agitator, it’s better to go with the spraying method.

If you’re looking for spray and detergent options, Helly Hansen swears by products from Grangers, and we tend to agree. If you opt for Grangers, they recommend to wash your jacket before applying the repel for the best results.

After reapplying DWR, it’s important to dry your jacket. If you’ve used the spray-on method, you can let the spray air dry and then run it through a drying cycle or dry it immediately if you choose. If you’ve used a detergent, then just take your jacket from the washer and add it to the dryer. Jackets should be dried on a low to medium setting for about 50 minutes, but check the care label of your garment to confirm the best method.

Drying after reapplying DWR is essential. The heat helps reactivate the waterproof properties of the repellent. Don’t forget this crucial step.

How to Wash a Waterproof Jacket

Get some additional insights on how to clean and re-waterproof your jackets.
Learn more

Preventing Future Damage

Now that you have a jacket that’s functioning good as new, there are a few basic principles to ensure that it retains its reinvigorated performative qualities. For storing, make sure that you hang up your jacket in a cool, dry place, preferably an uncrowded closet if you can manage it. 

Never leave your jackets packed into a pouch or left bunched up in your pack, especially after use, as this can cause mildew or mould to form and ruin the waterproof-breathable properties. It’s also important to know that as the outdoor industry moves away from PFC materials, a little more care is needed. Dirt and contaminates cause wetting out, which weakens the jacket’s performance. If it gets dirty or starts absorbing water, it’s always best to give it a good wash and dry, or reapply a repellent.

FAQ

How do you fix a hole in a shell jacket?

Clean the affected area and remove any loose threads. Avoid machine washing beforehand as this may worsen the tear. Using a patch, cut an appropriate size (leaving at least a 0.5” margin on all sides). Remove the backing sticker and apply the tape over the tear, rip, or hole. Smooth out any bubbles and make sure the edges are flat. Depending on the patch, it may require a heat application or friction to activate the adhesive. It also may need several hours to cure effectively.

How do you fix a ripped wax jacket?

Depending on the rip size, you can opt to use a tape, patch, glue, sewing, or a combination to repair a wax jacket. It’s recommended to adhere a patch from the inside (glue up), then follow up with a glue, stitching, or patch externally to retain the best waterproofing. For more severe tears, refer to the jacket's brand to see if they offer repairs or replacements. Babour offers repairs and re-waxing services for their wax jackets.

Can a ripped puffer jacket be repaired?

Most tears can be repaired with the right tools. Puffer jackets can be repaired with a variety of tapes or repair patches. It’s recommended to patch from the inside of the tear to retain the insulation and have a more invisible patching, or you may also patch both sides of the tear for a higher quality mend. The same repair techniques can also be applied to ski pants to ensure they remain functional in harsh conditions.

How to repair a rip in a waterproof jacket?

Some outdoor shops and brands offer adhesive tapes or repair patch kits that can fix most tears and rips. Always make sure to follow the instructions on the packaging as they can differ depending on the type or brand. The Helly Hansen Fabric Repair Patch Kit is fairly easy to apply and requires only hand friction to adhere it properly.

Final Thoughts

It’s important to keep in perspective that outdoor wear and gear like Helly Hansen’s shells and jackets are designed to withstand weather and the environments we expose them to for years, so on the occasion where your garment suffers a rip or a tear, remember that the functionality of your jacket is still very much present. You can restore a waterproof-breathable jacket in just a few minutes of your time.

If you feel the same, we’d love to hear about your successful repair stories, or share some other tips and tricks to keep our apparel looking and functioning their best and keep them out of our landfills.

The post How to Fix Tears in Shells & Down Jackets appeared first on Altitude Sports.

]]> https://kinsta.altitude-sports.com/en/how-to-fix-tears-in-shells-and-down-jackets/feed/ 0